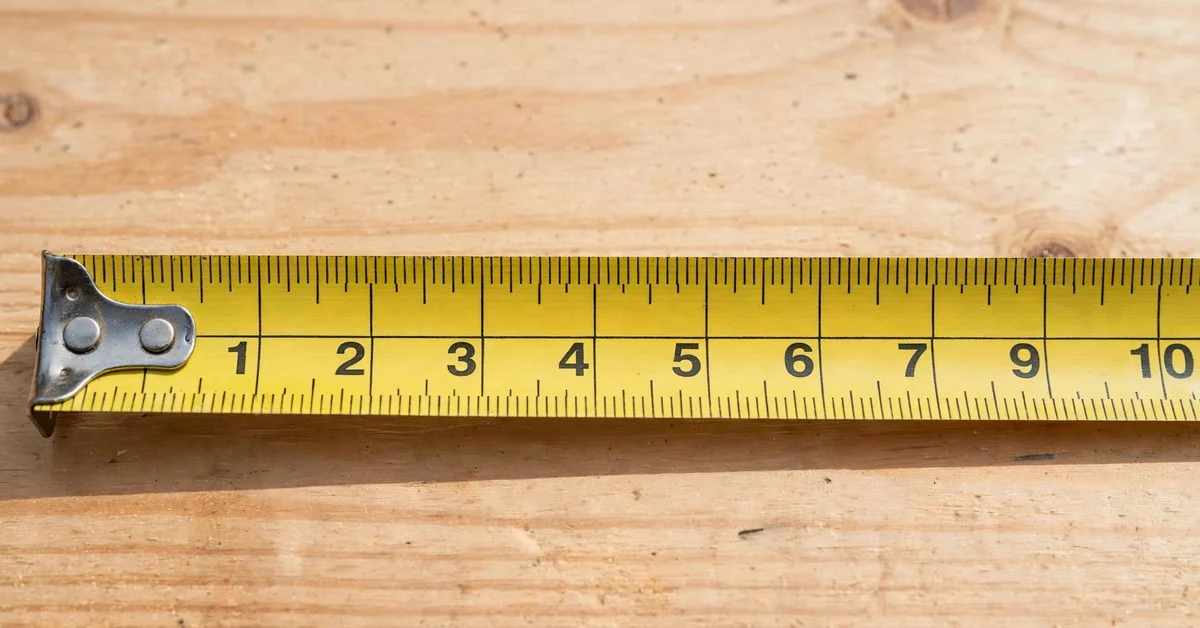
Pull out any tape measure and look at the crowded row of little lines between the big inch numbers. It can look like a secret code at first glance, but it is really just one simple pattern repeated over and over. Each inch on a standard measuring tape is divided into 16 equal marks, and once you know that the longest mark means a half inch and every shorter mark is half the size of the one before it, you can read any measurement in seconds.
Whether you are hanging curtains, cutting a board, or checking if a couch fits through a doorway, reading a tape measure in inches is a skill you will use for the rest of your life. This guide walks you through every part of the tape, shows you exactly what each mark means with a clear chart, and gives you step-by-step practice so fractions like 7/16 stop looking scary. By the end, you will read a measurement like 5 7/16 inches without a second thought.
Anatomy of a Measuring Tape
Before you read a single mark, it helps to know what you are holding. A tape measure has only a handful of parts, and each one has a job.
The end hook
The little metal tab at the very tip is called the hook, and here is the detail that surprises everyone: it is supposed to wiggle. The hook slides back and forth by exactly 1/16 of an inch. That movement is not a defect. When you hook it over the edge of a board, it pulls out to account for its own thickness; when you push it against a wall, it slides in for the same reason. Either way, your measurement starts at true zero.
The blade
The yellow (sometimes orange or black) metal strip is the blade. Most blades are 3/4 inch or 1 inch wide, and the width is printed right on the case because it matters: a wider blade can stretch farther without collapsing, a property called standout. A good 1-inch blade holds straight for 10 feet or more, which is why you can measure across a room by yourself.
The inch numbers
The big, bold numbers mark whole inches. Between them sit the smaller marks you are about to learn. On most tapes the numbers repeat every 12 inches alongside a foot marker, so you will see 1, 2, 3 … 11, then a special 1-foot mark, then the count restarts. A foot is 12 inches, so the foot marks keep long measurements readable at a glance.
The foot and stud marks
Every 12 inches you will spot a distinct marker, often a black box around the number or the label 1F, 2F, 3F, and on many tapes the foot numbers print in red. Some tapes also carry small black diamonds or triangles every 16 inches. Those are stud marks, placed for carpenters who frame walls with studs spaced 16 inches apart. You can ignore them for everyday measuring, but now you know what they are.
The lock and the case
The slide button on top locks the blade so it does not snap back while you read. And here is a trick worth knowing: the length of the case itself is printed on its side (often 3 or 3.5 inches). When you measure inside a corner where the hook cannot catch, you can butt the case against the wall and add the case length to your reading.
The Marks Between Inches, Largest to Smallest
Here is the whole secret of the tape: the marks between two inch numbers get shorter as the fractions get smaller. Learn the order once and you will never count blindly again.
From longest to shortest:
- The longest mark (exactly halfway between two inch numbers) is the 1/2 inch mark = 0.5.
- The next-longest marks divide each half into two, giving the quarter inches: 1/4 = 0.25 and 3/4 = 0.75.
- The next size down divides each quarter into two, giving the eighth inches: 1/8 = 0.125, 3/8 = 0.375, 5/8 = 0.625, 7/8 = 0.875.
- The shortest marks divide each eighth into two, giving the sixteenth inches: every 1/16 step = 0.0625.
Every mark is simply half the length of the one before it. That halving pattern is the only thing to memorize. Here is the complete chart for one inch, which works identically inside every inch on the tape:
| Mark | Fraction | Decimal |
|---|---|---|
| Shortest | 1/16 | 0.0625 |
| Short | 1/8 | 0.125 |
| Shortest | 3/16 | 0.1875 |
| Medium-short | 1/4 | 0.25 |
| Shortest | 5/16 | 0.3125 |
| Short | 3/8 | 0.375 |
| Shortest | 7/16 | 0.4375 |
| Longest | 1/2 | 0.5 |
| Shortest | 9/16 | 0.5625 |
| Short | 5/8 | 0.625 |
| Shortest | 11/16 | 0.6875 |
| Medium-short | 3/4 | 0.75 |
| Shortest | 13/16 | 0.8125 |
| Short | 7/8 | 0.875 |
| Shortest | 15/16 | 0.9375 |
Notice how the decimals climb in perfectly even steps of 0.0625. Once you see that rhythm, reading sixteenths becomes counting, not guessing. And if you ever need the metric side of things, remember that one inch is exactly 2.54 centimeters, though most measuring jobs in the US stay in inches and fractions.
Step-by-Step: Reading a Measurement
Grab your tape and follow along. The method is the same whether you are measuring 3 inches or 30 feet.
Step 1: Anchor the hook properly
Hook the end tab over the edge of whatever you are measuring, or press it flat against a surface for an inside measurement. Let it do its little slide; that movement is keeping your reading honest. Make sure the blade lies flat and straight, not twisted or sagging.
Step 2: Read the whole inches first
Look at where the edge of your object meets the blade. Find the last whole inch number before that point. If the edge falls between the 4 and the 5, your measurement starts with 4 inches. Say it out loud: “four inches and something.”
Step 3: Find the longest mark past it
Starting from the 4-inch line, scan right for the longest mark before the edge. If the edge is past the half-inch mark, you have at least 1/2. This one step eliminates most confusion, because the half-inch mark is unmistakable once you know to look for it.
Step 4: Work down through the smaller marks
Now narrow it down. Is the edge past a quarter mark? An eighth mark? Keep going to the smallest marks until you find the exact one the edge touches. Count carefully: the sixteenth marks are tiny, so look straight down at the blade rather than at an angle.
Step 5: Add the parts together
Combine the whole inches with the fraction. Four whole inches plus five eighth-marks is 4 5/8 inches. Whole number first, then the fraction, written with a space between them.
Step 6: Double-check before you cut
Read it once more, especially if a saw is involved. A quick trick: measure twice from opposite ends. If both readings agree, you can cut with confidence. Carpenters live by “measure twice, cut once” because a misread sixteenth is the difference between a joint that fits and one that does not.
Common Mistakes (and How to Avoid Them)
Almost every misread tape comes from the same short list of errors. Run through them once and you will avoid nearly all of them.
Measuring from the case instead of the hook
The most common beginner error is lining the object up with the edge of the plastic case or the 1-inch mark instead of the hook. Every measurement must start at the hook’s inner face, which is the true zero. If the hook cannot catch on anything, butt the case into the corner and add the case length printed on its side.
Fighting the sliding hook
Some people notice the hook wiggling and try to hold it still, or worse, assume the tape is broken. Do not fight it. That 1/16-inch slide is the mechanism that keeps inside and outside measurements equally accurate. Let it move.
Confusing eighths with quarters
The quarter marks and eighth marks look similar at a glance, and mixing them up doubles your error. When in doubt, count from the nearest half-inch mark instead of from the inch line. There are only eight eighth-marks per inch, so counting “three past the half” is harder to get wrong than counting from zero.
Misreading the foot marks
On a long measurement, it is easy to read “2 inches past the 1-foot mark” as just “2 inches.” When you see 1F on the blade, say “one foot” out loud and keep counting: 1 foot 2 inches is 14 inches total. For longer spans, remember that a yard is 36 inches, or 3 feet, which helps you sanity-check big readings.
Reading the wrong edge of the blade
Many tapes print inches along one edge and centimeters along the other. If your numbers look oddly small, you are probably reading the metric edge. Check which side says “in” or shows the familiar fractions before you trust the reading.
Reading at an angle
Looking at the blade from the side shifts where the edge appears to land, sometimes by a full sixteenth. Get your eye directly above the mark. It takes one extra second and removes the single biggest source of “the tape said one thing and the cut says another.”
Quick Practice Examples
Theory is fine, but reading clicks faster with examples. Cover the answers, try each one, then check.
Example 1: What does 3 5/8 inches look like?
Find the 3-inch line. Move right past the half-inch mark (that is 3 1/2), then count one more eighth-mark. That mark, sitting between 1/2 and 3/4, is 5/8. So 3 5/8 is three whole inches plus five eighth-marks. In decimals, that is 3.625 inches.
Example 2: What does 7 1/4 inches look like?
Find the 7-inch line. The first medium-short mark after it is the quarter mark: 7 1/4. It is exactly halfway between 7 and 7 1/2. In decimals, 7.25 inches. This is one of the easiest readings on the whole tape, and a good confidence builder.
Example 3: What does 11 13/16 inches look like?
Find the 11-inch line and count thirteen of the shortest marks past it. That sounds tedious, so here is the faster way: 13/16 is one sixteenth short of 7/8. Find the 7/8 mark (the last short mark before the 12), then step back one tiny mark. That is 11 13/16, or 11.8125 inches in decimals.
Example 4: What does 9 3/16 inches look like?
Find the 9-inch line. The 3/16 mark is the third shortest mark, sitting between the 1/8 and 1/4 marks. A handy way to find it: locate the 1/4 mark first, then step back one tiny mark. In decimals, 9.1875 inches.
If these felt slow, that is normal. Speed comes from repetition, and after a dozen real measurements you will stop counting marks and start recognizing them the way you recognize words instead of letters.
Frequently Asked Questions
Why does the hook on my tape measure feel loose?
It is designed that way. The hook slides exactly 1/16 of an inch so that outside measurements (hook pulled over an edge) and inside measurements (hook pushed against a surface) both start at true zero. A hook that does not move would actually give wrong readings.
What do the red numbers on a measuring tape mean?
On most tapes, the numbers turn red (or sit in a black box labeled 1F, 2F) every 12 inches to mark whole feet. Some tapes also show small black diamonds every 16 inches; those are stud marks for wall framing and can be ignored for everyday measuring.
How do you read 5/8 on a measuring tape?
Find the whole inch, then count five eighth-marks past it, or find the half-inch mark and go one eighth-mark further. The 5/8 mark sits between 1/2 and 3/4, and it equals 0.625 inches in decimals.
Is a tape measure marked in inches or centimeters?
Most tape measures sold in the US are marked in inches and fractions of an inch, and many are dual-scale with centimeters along the opposite edge. Always check which edge you are reading before trusting a measurement.
Final Thoughts
Learning how to read a measuring tape in inches comes down to one pattern: 16 marks per inch, each mark half the size of the one before it. The longest is a half, then quarters, then eighths, then sixteenths, and the decimals climb in neat 0.0625 steps. With that pattern in your head, the blade stops looking like a puzzle and starts looking like what it is: a ruler that happens to roll up.
The real skill is not memorizing the chart but trusting the method. Anchor the hook, read the whole inches, find the longest mark, count down to the smallest, and double-check before you cut. Practice on a few objects around the house today, a book, a doorway, a tabletop, and by tomorrow you will read measurements like 7 3/16 without counting a single mark. That is the moment the tape measure becomes a tool instead of a mystery.

I’m Elena Cross, a content writer at MeasuresIt.com, where I turn complex measures, units, and mathematical concepts into clear, accurate, and easy-to-read articles. I’m passionate about precision in numbers and in words and I write to help readers actually understand measurements, not just memorize them.